
Sweet, chewy, and intensely pear-flavored, dried pears are one of the simplest ways to capture the season — and you don’t necessarily need a dehydrator to make them.
When pears are plentiful at the farmers market, it can be tempting to bring home more than you can possibly eat before they ripen. Fortunately, pears are exceptionally good candidates for drying.
As they slowly lose moisture, their delicate sweetness becomes concentrated and their texture changes from juicy and crisp to soft, chewy, and almost candy-like. No added sugar is necessary.
There is one challenge: cut pears begin to brown almost immediately. A traditional ascorbic-acid or lemon-water bath works beautifully, but there is another particularly delicious option — pineapple juice.
Pineapple juice contains naturally occurring citric and ascorbic acids, which help slow browning, while lending the pears a subtle tropical sweetness. Utah State University Extension includes pineapple juice among the fruit juices that can be used as a pretreatment before drying.
The result doesn’t taste distinctly like pineapple. Instead, the pear flavor seems just a little brighter and sweeter.
Pineapple-Juice Dried Pears
Choose pears that are ripe but still firm. Bartlett pears are particularly well suited to drying, although Bosc, Anjou, and other flavorful varieties can also be used. Avoid very soft or overripe fruit; it is difficult to slice evenly and takes longer to dry.
INGREDIENTS:
- Firm-ripe pears
- Pure unsweetened pineapple juice, enough to cover the sliced pears
- Optional: ground cinnamon, cardamom, ginger, or a very light grating of nutmeg
Prepare the Pears
Wash the pears thoroughly. Peel them if desired, although leaving the peel on adds color, texture, and makes preparation considerably faster. Keep in mind that pear skin can become slightly tougher when dried.
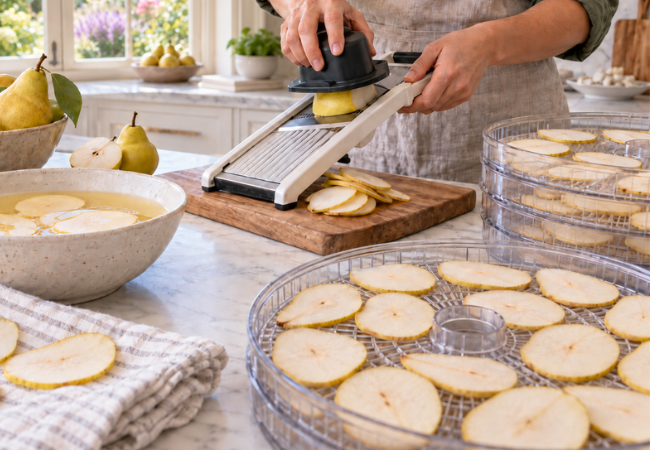
Cut the pears lengthwise, remove the cores, and slice approximately 1/8 to 1/4 inch thick. (If you have a mandoline, this is a great time to use it!) The most important consideration is consistency: slices of similar thickness will finish drying at roughly the same time.
As you work, place the pear slices into a bowl of unsweetened pineapple juice. Soak for approximately 3 to 5 minutes, gently moving the slices around so all surfaces are exposed to the juice.
Drain thoroughly in a colander and gently blot away excess juice with a clean kitchen towel or paper towel.
If you’d like spiced pears, this is the time to add a very light dusting of cinnamon, cardamom, ginger, or nutmeg.
Dehydrator Method
Arrange the pear slices in a single layer on the dehydrator trays, leaving enough room between pieces for air to circulate. Do not overlap them.
Dry at 135°F to 140°F until the pears are pliable and leathery with no visible pockets of moisture. Depending on the thickness of the slices, the variety of pear, humidity, and dehydrator, sliced pears may take roughly 6 to 10 hours or longer. Drying times should always be regarded as a guide rather than a deadline.
Because pineapple juice contains natural sugar, the finished pears may feel slightly tackier than pears treated with a plain ascorbic-acid solution.
To test, remove a slice and let it cool before tearing it in half. There should be no visible moisture in the center and no moisture should appear when the fruit is squeezed. Properly dried pears should remain flexible rather than brittle.
No Dehydrator? Use the Oven
Pears can also be dried successfully in a conventional oven, provided the oven can maintain a sufficiently low temperature.
Arrange the prepared slices in a single layer on wire racks placed over rimmed baking sheets, or use drying racks that allow air to circulate around the fruit.
Set the oven to approximately 140°F to 150°F. Penn State Extension recommends oven drying pear slices at temperatures as low as 150°F, while Colorado State’s Preserve Smart guidance uses 140°F for either an oven or dehydrator.
A convection setting can be helpful because moving air carries moisture away from the fruit.
Begin checking the pears after several hours and rotate the pans as needed. Oven drying often takes considerably longer than dehydrator drying — sometimes as much as twice as long — and the exact timing will depend on your oven and the thickness of the pears.
Watch them especially carefully toward the end of the process. As the moisture disappears, fruit can go from perfectly dried to overly dry surprisingly quickly.
If your oven cannot operate below about 170°F, a food dehydrator will generally produce more consistent results.
Don’t Skip This Step: Condition the Pears
Here’s the part many homemade dried-fruit recipes leave out.
Even when pear slices appear completely dry, some pieces may contain slightly more moisture than others. Conditioning allows that remaining moisture to equalize before the fruit is sealed for storage.
Once the pears have cooled completely, place them loosely in a clean glass or food-safe container, filling it only about two-thirds full.
Cover and keep the container in a dry place for several days, shaking or stirring the fruit daily so the pieces don’t stick together.
Watch the inside of the container carefully. If you see beads of moisture or condensation, the pears are not sufficiently dry. Return them to the dehydrator or oven, dry them further, cool completely, and begin the conditioning process again. Extension recommendations generally call for conditioning dried fruit for roughly 4 to 10 days.
Once conditioned, transfer the pears to airtight containers or vacuum-sealed bags and store them in a cool, dry, dark location. Properly dried and stored fruit can retain good quality for approximately six to twelve months.
How to Use Dried Pears
Don’t think of these simply as snack food. Dried pears can become a remarkably versatile pantry ingredient.
They are particularly lovely on a cheese or charcuterie board, where their concentrated sweetness pairs beautifully with aged cheddar, Manchego, Gruyère, Parmesan, goat cheese, Brie, blue cheese, toasted walnuts, hazelnuts, almonds, and salty cured meats.
Chop them and add them to granola, oatmeal, muesli, trail mix, scones, muffins, quick breads, biscotti, cookies, or stuffing. Try them in a fall salad with bitter greens, toasted walnuts, blue cheese, and a sharp vinaigrette.
They can also be gently rehydrated in warm water, apple cider, tea, or another flavorful liquid and used in cakes, compotes, sauces, and baked desserts.
Or try one of the simplest combinations of all: a dried pear slice topped with a sliver of good cheese and a toasted walnut.
Sometimes preserving the harvest doesn’t require jars, boiling water, or a freezer full of containers. A bowl of pears, a splash of pineapple juice, and a little patience can turn an abundant fall crop into something you’ll be very happy to rediscover in the pantry months from now.