
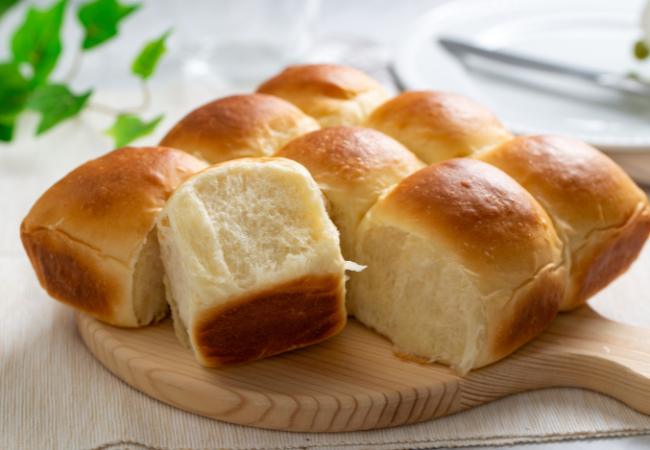
Some recipes become family traditions, and these old-fashioned feather-light pan rolls have been part of our Thanksgiving table for as long as I can remember. Soft, pillowy, and beautifully golden, they’re everything a homemade dinner roll should be—delicately tender, wonderfully buttery, and so light they practically melt in your mouth.
I’ve been making these rolls for years, and one thing never changes: I always make a generous batch, regardless of how many guests are coming for dinner. Partly because they disappear so quickly (I’ve actually had to hide them from the kids to keep everyone from sneaking a roll or two before dinner!), but mostly because the leftovers make the most sublime turkey sandwiches the following day.
These are traditional yeast rolls, made with a little patience and an old-fashioned overnight rise that develops flavor and makes holiday preparations easier. I prefer to prepare the dough the day before, refrigerate it overnight, and shape the rolls on Thanksgiving morning. Once they’ve risen until beautifully puffy, they bake into soft, golden clouds that pull apart effortlessly.
Of course, Thanksgiving presents one small challenge: oven space! With a turkey occupying the oven for much of the day, timing fresh dinner rolls requires a little planning. My favorite solution is to schedule their final rise so they’re ready to bake as soon as the turkey comes out to rest. That usually provides enough time to bake the rolls while the finishing touches are made to the rest of dinner. And there’s nothing quite like the glorious fragrance of freshly baked bread filling the kitchen just before everyone sits down to eat.
Serve them warm with good butter, use them to soak up every last spoonful of turkey gravy, or save a few for breakfast with homemade jam. Just be sure to make plenty. Trust me, you’ll want leftovers!
INGREDIENTS:
1/2 cup sugar
2 teaspoons salt
2 packages instant dry yeast (4 1/2 teaspoons)
1/2 cup nonfat dry milk powder
6 cups all-purpose flour, divided (approximately)
2 cups water
1/2 cup butter
2 large eggs
Vegetable oil, for greasing
2 tablespoons butter, melted, for brushing
METHOD:
Prepare the Dough
In the bowl of a stand mixer fitted with the paddle attachment, combine the sugar, salt, yeast, nonfat dry milk powder, and 2 1/2 cups of the flour. Mix briefly to combine.
In a large microwave-safe measuring cup, heat the water and butter until very warm, approximately 120–130°F. The butter does not need to melt completely.
With the mixer running on low speed, gradually pour the warm liquid into the flour mixture. Beat until thoroughly blended, then add the eggs.
Increase the mixer speed to medium and beat for 5 minutes, stopping occasionally to scrape down the sides of the bowl.
Add another 1 1/2 cups of flour to form a thick batter. Continue beating for another 5 minutes. This extended mixing helps develop the gluten that gives the finished rolls their wonderfully light, feathery texture.
Switch to the dough hook. Gradually add enough of the remaining flour to form a soft, slightly tacky dough that pulls away from the sides of the bowl. Avoid adding too much flour; a soft dough is essential for tender dinner rolls.
Knead on low speed for approximately 8–10 minutes, or until the dough is smooth, elastic, and supple.
First Rise and Overnight Refrigeration
Lightly grease a large bowl with vegetable oil. Transfer the dough to the bowl, turning once to coat the surface lightly with oil.
Cover and allow to rise in a warm, draft-free place until doubled in size, approximately 1–1 1/2 hours, depending on room temperature.
Gently deflate the dough, turn it over, and lightly brush the exposed surface with vegetable oil. Cover the bowl tightly and refrigerate overnight.
The dough will continue to rise slowly in the refrigerator, developing flavor while giving you flexibility in your holiday baking schedule. If it rises substantially during refrigeration, gently deflate it. Use a container large enough to accommodate expansion.
Shape the Rolls
The following day, generously grease a 15 1/2 x 10 1/2-inch roasting pan or half-sheet pan, along with a second smaller baking pan.
Remove the dough from the refrigerator and turn it onto a lightly floured work surface. Divide into 30 approximately equal portions.
Shape each portion into a smooth, round ball by gently stretching the surface of the dough and tucking the edges underneath. Arrange the rolls evenly in the prepared pans, leaving a little space between them for expansion.
Cover loosely with a clean kitchen towel or lightly greased plastic wrap and allow to rise in a warm, draft-free place until doubled in size and noticeably puffy, approximately 1 1/2 hours. Because the dough is cold, the final rise may take a little longer. Let the appearance of the rolls, rather than the clock, be your guide.
Bake the Rolls
Preheat the oven to 375°F.
Bake for approximately 27–30 minutes, or until the rolls are beautifully golden brown and sound hollow when lightly tapped. If using pans of different sizes, check them separately, as baking times may vary. For an additional doneness check, the centers should register approximately 190°F on an instant-read thermometer.
Remove from the oven and allow the rolls to rest in their pans for 5 minutes.
Transfer to a wire rack and brush the warm tops lightly with melted butter for a beautifully soft, glossy finish.
Serve warm, preferably with plenty of good butter.
Baker’s Notes:
The secret to feather-light rolls: Resist the temptation to add too much flour. The dough should be soft and slightly tacky rather than stiff or dry. Thorough mixing and kneading develop the gluten structure that allows the rolls to rise beautifully while maintaining their delicate, tender crumb.
Why use nonfat dry milk powder? Milk powder contributes milk solids without adding extra liquid, helping create a soft, tender crumb while encouraging beautiful browning. It’s one of the ingredients that gives these traditional rolls their characteristic texture.
The overnight advantage: Preparing the dough a day ahead makes these rolls particularly convenient for Thanksgiving and other special dinners. The slow, refrigerated rise also allows additional flavor to develop. Plan to shape the rolls and allow sufficient time for their final rise before baking.
A note about yeast and water temperature: This recipe uses a traditional rapid-mixing method in which instant dry yeast is combined directly with the flour rather than dissolved in water first. The flour helps buffer the yeast from the warm liquid. Keep the water-butter mixture within the specified temperature range and avoid overheating it.
For beautifully soft sides: Arrange the dough balls fairly close together in the baking pans. As they rise and bake, the rolls will gently touch, producing tender sides that pull apart easily.
Thanksgiving baking schedule (especially for a single oven): Work backward from when you expect the turkey to come out of the oven. Allow approximately 1 1/2–2 hours for the cold, shaped rolls to rise, although a cool kitchen may require more time. Ideally, they’ll be beautifully puffy and ready for baking just as the turkey is removed to rest.
Once the turkey is out, adjust the oven temperature to 375°F and bake the rolls for approximately 27–30 minutes. If both pans fit comfortably, bake them together, rotating as needed for even browning.
Remember that yeast dough follows its own schedule! If the rolls are rising faster than anticipated and the turkey isn’t finished, transfer the covered pans to the refrigerator to slow their rise. Allow additional time for proofing if needed before baking. Avoid leaving fully proofed rolls in a warm kitchen for an extended period.
Make-ahead and reheating: If oven timing becomes too complicated, these rolls can certainly be baked earlier in the day—or even the day before—and reheated. Cool completely and store in an airtight container at room temperature for up to 2 days. To serve, wrap the rolls loosely in foil and warm in a 300°F oven for approximately 10–15 minutes, or until heated through. They’ll still be wonderfully soft and delicious, although you’ll miss some of that glorious fresh-bread fragrance filling the kitchen just before dinner!
Freezing: For longer storage, freeze completely cooled rolls in airtight freezer bags or containers for up to 2–3 months. Thaw at room temperature and reheat gently before serving.
Serving Suggestions
For Thanksgiving: Serve warm with butter alongside roast turkey, mashed potatoes, and gravy. Their soft, delicate texture makes them especially good for soaking up the wonderful pan juices.
For leftover turkey sandwiches: Split the rolls and fill with sliced roast turkey, cranberry sauce, a little dressing, and perhaps a dab of mayonnaise. These miniature Thanksgiving sandwiches might be even better than the original dinner!
For breakfast the next morning: Warm a roll, split it open, and spread with butter and homemade jam, fruit preserves, or honey.
For special Sunday dinners: These rolls are equally wonderful with roast chicken, beef, ham, or a comforting pot roast.
YIELD: 2 1/2 dozen (30 rolls)